HardnessTesting

HARDNESS TESTING

Hardness testing is a key element in many quality control procedures and R&D work.

What is hardness testing? How can you select the best hardness testing method? What is the best application for hardness testing? And how can you draw conclusions of hardness tests? The following pages answer these questions – and more.

To see our range of hardness testing machines and accessories, check out our hardness testing equipment page.

See our Hardness Testing Application Note

See our Hardness Testing Conversion Poster

What is the definition of hardness testing?

The application of hardness testing enables you to evaluate a material’s properties, such as strength, ductility and wear resistance, and so helps you determine whether a material or material treatment is suitable for the purpose you require.

The definition of hardness testing is ‘a test to determine the resistance a material exhibits to permanent deformation by penetration of another harder material.’ However, hardness is not a fundamental property of a material. Therefore, when drawing conclusions of a hardness test, you should always evaluate the quantitative value in relation to:
  • The given load on the indenter
  • A specific loading time profile and a specific load duration
  • A specific indenter geometry

How do hardness tests work?

A hardness test is typically performed by pressing a specifically dimensioned and loaded object (indenter) into the surface of the material you are testing. The hardness is determined by measuring the depth of indenter penetration or by measuring the size of the impression left by an indenter.
  • Hardness tests that measure the depth of indenter penetration include: Rockwell, Instrumented Indentation Testing, and Ball Indentation Hardness
  • Hardness tests that measure the size of the impression left by the indenter include: Vickers, Knoop, and Brinell

SELECTING THE BEST HARDNESS TEST METHOD

How to select the test method

The hardness test you choose should be determined by the microstructure – e.g. the homogeneity – of the material you are testing, as well as the type of material, the size of the part and its condition.

In all hardness tests, the material under the indent should be representative of the whole microstructure (unless you attempting to ascertain the different constituents in the microstructure). Therefore, if a microstructure is very coarse and heterogeneous, you need a larger impression than for a homogeneous material.

There are four main hardness tests, each with their own set of benefits and requirements. There are different standards for these tests, which explain the procedures and application of the hardness test in detail.

When selecting a hardness test method, important considerations include:
  • The type of material to be hardness tested
  • Whether compliance with a standard is required
  • The approximate hardness of the material
  • The homogeneity/heterogeneity of the material
  • The size of the part
  • Whether mounting is necessary
  • The number of samples to be tested
  • The required accuracy of the result

The four most common indentation hardness tests

Rockwell

The Rockwell hardness test

Rockwell is a fast hardness test method developed for production control, with a direct readout, mainly used for metallic materials. The Rockwell hardness (HR) is calculated by measuring the depth of an indent after an indenter has been forced into the specimen material at a given load.

  • Generally used for larger sample geometries
  • A ‘quick test’ mainly used for metallic materials
  • Can be used for advanced tests, such as the Jominy (end quench) test (HRC)

Vickers

The Vickers hardness test

Vickers is a hardness test for all solid materials, including metallic materials. The Vickers Hardness (HV) is calculated by measuring the diagonal lengths of an indent in the sample material left by introducing a diamond pyramid indenter with a given load. The diagonals of the indent are measured optically in order to determine the hardness, using a table or formula.

  • Used for hardness testing of all solid materials, including metallic materials
  • Suitable for a wide range of applications
  • Includes a sub-group of hardness testing of welds

Knoop

The Knoop hardness test

Knoop (HK) is an alternative to the Vickers test in the micro hardness testing range. It is mainly used to overcome cracking in brittle materials, as well as to facilitate the hardness testing of thin layers. The indenter is an asymmetrical pyramidal diamond, and the indent is measured by optically measuring the long diagonal.

  • Used for hard and brittle materials, such as ceramics
  • Suitable for small elongated areas, such as coatings

Brinell

The Brinell hardness test

The Brinell hardness test is used for hardness testing larger samples in materials with a coarse or inhomogeneous grain structure. The Brinell hardness test (HBW) indentation leaves a relatively large impression, using a tungsten carbide ball. The size of the indent is read optically.

  • Used for materials with a coarse or inhomogeneous grain structure
  • Used for larger samples
  • Suitable for forgings and castings where the structural elements are large

HOW TO ENSURE ACCURACY AND REPEATABILITY IN HARDNESS TESTING

The correct application of hardness testing requires careful preparation and execution. However, once you have the basics in place, most hardness tests offer good accuracy and repeatability.

Factors that influence hardness testing

A number of factors influence hardness tests results. As a general rule, the lower the load you use in the hardness test, the more factors that need to be controlled to ensure an accurate conclusion of the hardness test.

Here are a few of the most important factors to consider to ensure an accurate conclusion from a hardness test.
  • External factors such as light, dirt, vibrations, temperature, and humidity should be controlled
  • The tester and stage should be secured on a solid horizontal table, and the sample should be clamped or held in a holder or anvil
  • The indenter should be perpendicular to the tested surface
  • Illumination settings should be constant during the test when using Vickers, Knoop, or Brinell
  • The tester should be recalibrated/verified every time you change the indenter or objective lens
Hardness testing

Surface preparation requirements for hardness testing

Before hardness testing of metallic materials or other materials, you must prepare the surface. The required surface condition depends on the type of test and load used. In general, the quality of surface preparation has a direct effect on the hardness test result, so you should consider the trade-off between surface quality and test result variation before deciding on an inferior surface preparation.

Macro hardness testing
A ground surface is usually sufficient, and sometimes no preparation is required.

Micro hardness testing
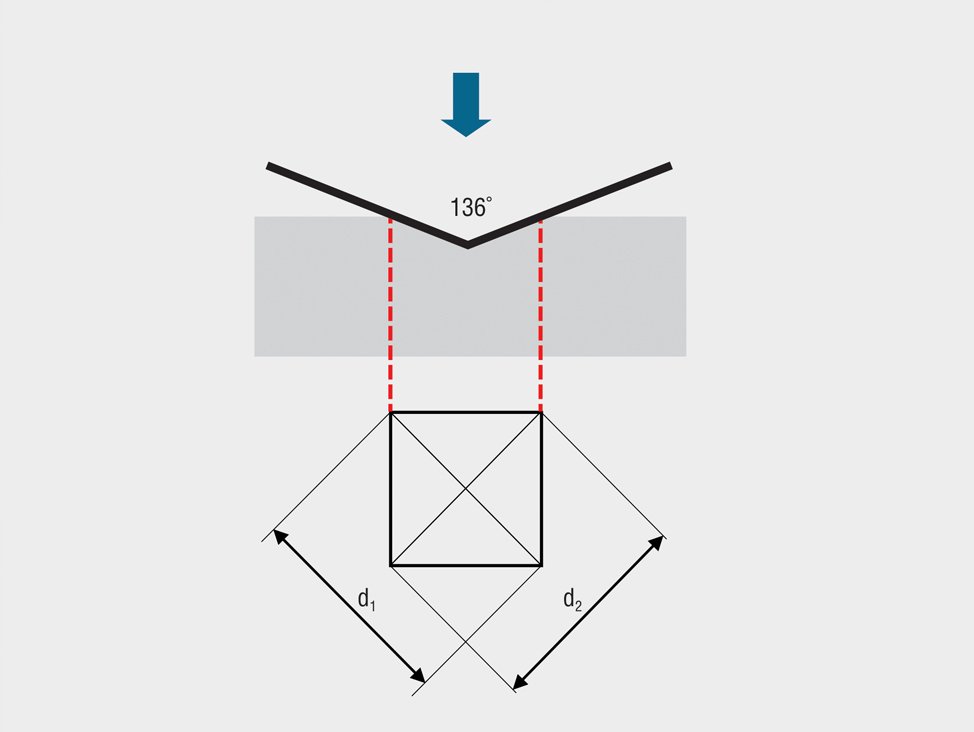
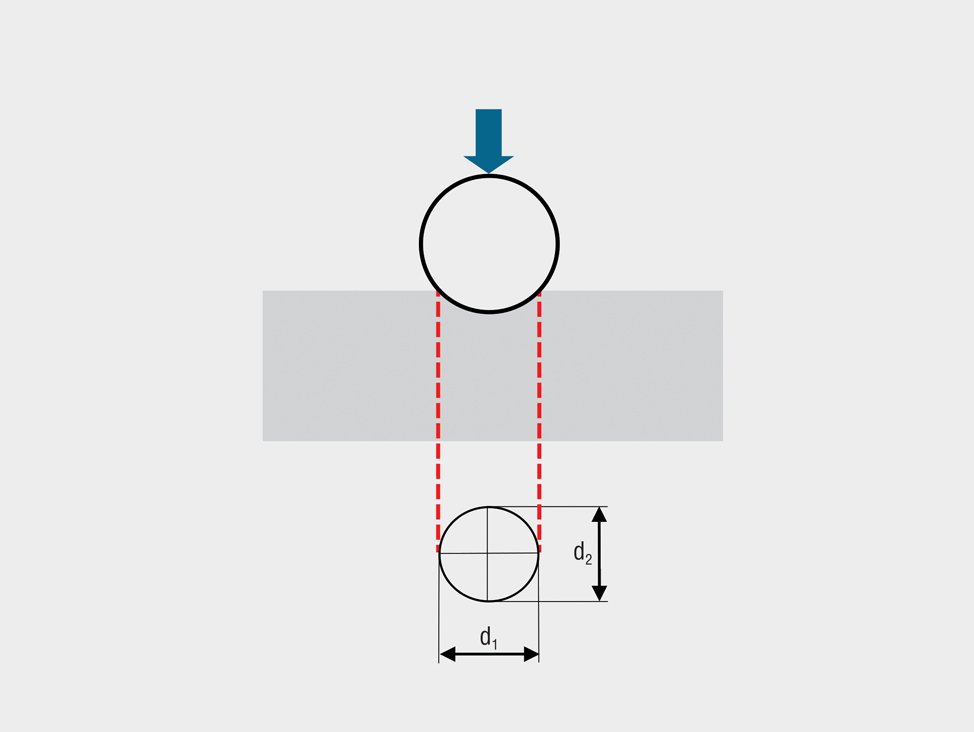
Due to the lower loads used during hardness testing, micro hardness testing requires a polished or electropolished surface. It is important that the borders/corners of an optically evaluated impression are clearly visible. This can be performed mechanically, chemically, or electrochemically. It is important that heating or cold working does not change the surface properties of the specimen.

Deformations

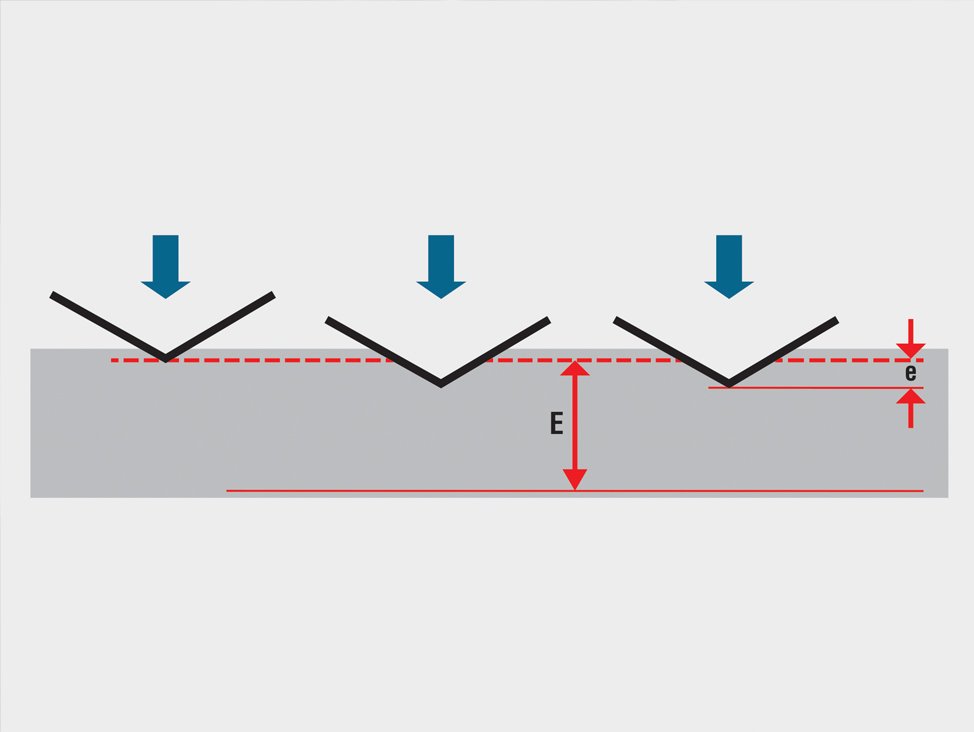
Cutting and grinding may introduce deformations. These must be removed by polishing down to 6.0, 3.0, or 1.0 μm, depending on the hardness test load.

For small loads (less than 300 gf1) the surface needs to be completely free of deformations, and the specimens require oxide or electrolytic polishing to obtain a completely damage-free surface. You should also take into account that soft and/or ductile materials (i.e. for HV less than 120-150) are more sensitive when it comes to introducing preparation artefacts.

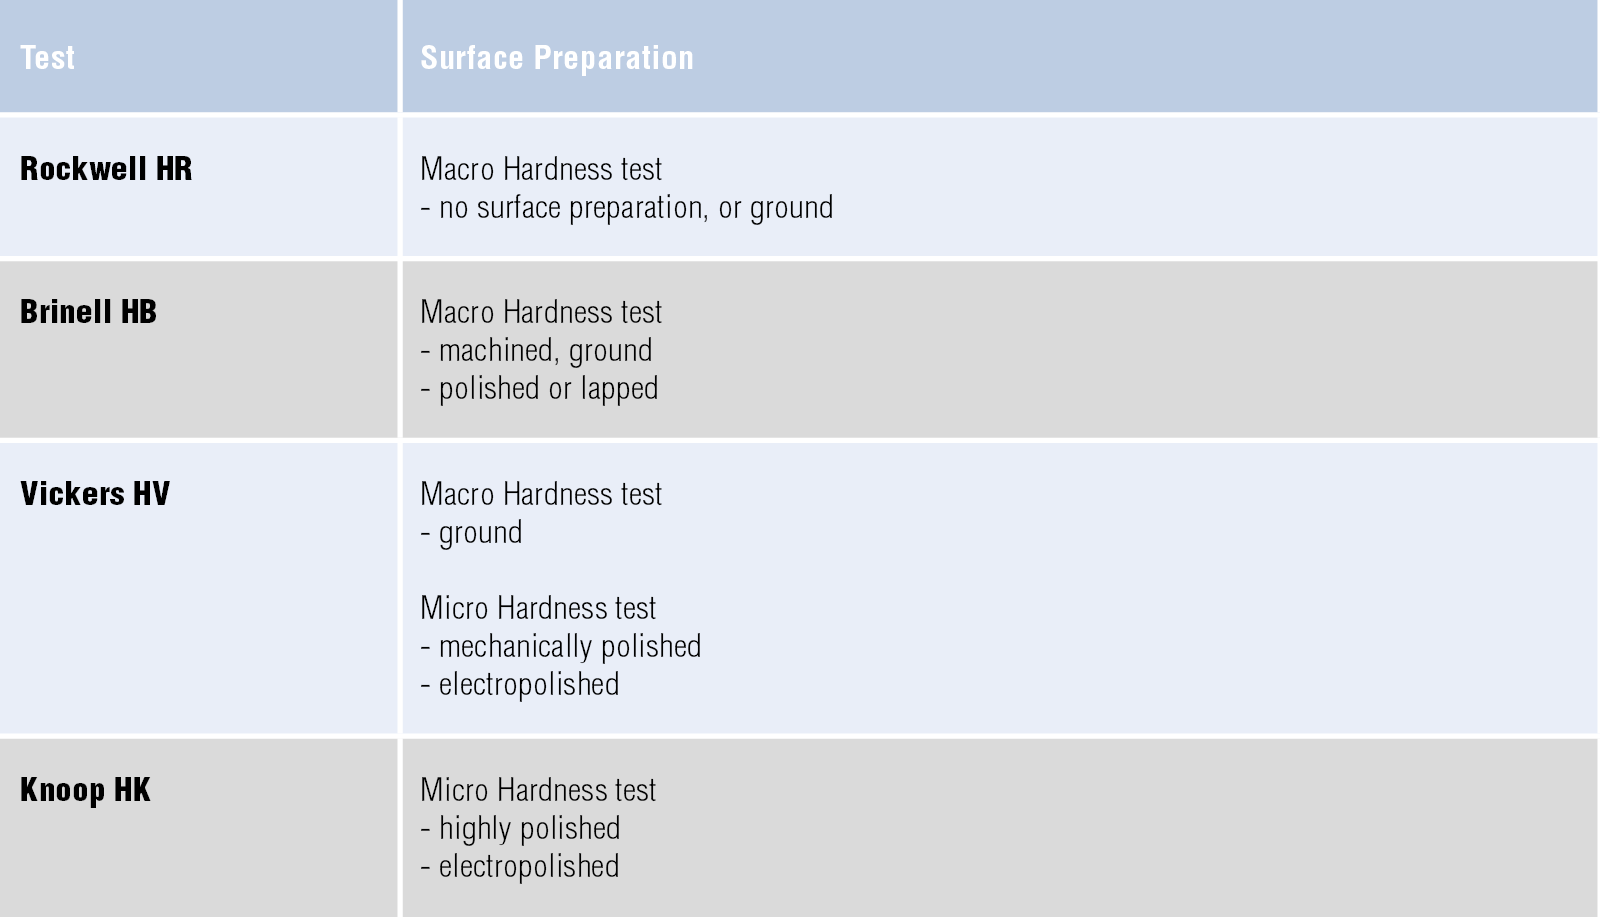
In the table below, you can see the surface preparation requirements for the different hardness tests.

HAT

DEFINITION OF HARDNESS TESTING LOADS

Officially, hardness testing loads are expressed in Newton (N). However, historically, loads were expressed in kilogram-force (kgf), gram-force (gf), or pond (p). The correlation between kgf, kp, and N is: 1.0 kgf = 1,000 gf = 1.0 kp = 9.81 N.
  • The term micro hardness testing is usually used when indentation loads are below or equal to 1 kgf
  • The term macro hardness testing is used when loads are higher than 1 kgf

If standards permit, use the highest possible load/force for largest indent to ensure the most accurate results.

The loads used by each of the four methods for hardness testing of metallic materials* comply with the different ISO and ASTM standards.

HAT
Hardness Testing Indent Spacing

INDENT SPACING

During hardness testing, the indentation will deform the surrounding material and alter its properties. In order to avoid misinterpretations of the perceived hardness, the standards prescribe a certain distance between multiple indentations.

Examples of indent spacing in the Vickers hardness test for metallic materials

  • For steel, copper, and copper alloys: Spacing between indents must be at least three diagonal widths
  • For lead, zinc, aluminum, and tin: Spacing between indents must be at least six diagonal widths

TROUBLESHOOTING FOR HARDNESS TESTS

Problem

It can be difficult to obtain plane-parallel surfaces during preparation for the hardness test. Also, the indenter should be perpendicular to the test surface. For the Vickers hardness test, the measured diagonals should not deviate more than 5.0% from each other. For the Knoop hardness test, the two halves of the long diagonals must not differ by more than 10.0% from each other.

Show More
Solution:

If the deviation is not due to anisotropy in the material, the best solution is to use a fixture to hold the specimen so that the indenter penetrates the surface perpendicularly. If no fixture is available, make sure the mechanical preparation of the specimen gives you plane-parallel end surfaces.
If the surface finish of a specimen is too rough, it might be hard to evaluate the corners of an indent, especially if automatic equipment is used. Scratches from preparation may cause a misreading of the indent size when using automatic hardness testing.
Show More
Solution

Use a polished surface. Surface preparation requirements depend of the applied load and hardness of the material: the softer the material, the better the polish that is required. See preparation requirements in the How to Hardness Test section, and find a suitable preparation method for the material in the e-metalog.
If the specimen is not properly cleaned after mechanical preparation and you perform an optical reading of the hardness test, an automatic reading might result in a misinterpretation of the corners of the indent.
Show More
Solution

Always ensure that the specimens are cleaned properly before performing the hardness test, otherwise contaminants from the polishing cloth (dirt or fibers, for example) might complicate the reading.
For a heavily etched sample, it might be difficult to evaluate the corners of an indent, which may lead to a less accurate conclusion of the hardness test.
Show More
Solution

Etching should be avoided as far as possible, because it results in a less reflective surface. If etching is necessary, a light etch is preferable, so that it will be possible to discriminate the corners of the indent. Sometimes it can be necessary to etch when evaluating a weld, for example.
The hardness appears greater than expected.
Show More
Solution

Check the rules for proper indent spacing for the intended hardness test. If the hardness indentations are too close to each other, strain hardening can appear.
Hardness Testing Equipment

A FULL RANGE OF HARDNESS TESTING MACHINES

Hardness testing is key in most quality control procedures. That’s why we provide a complete range of hardness testing equipment and accessories for every need, from small lab applications to heavy-duty hardness testing in production.

Check out our range of hardness testing equipment to ensure your equipment is up to the task.

See our hardness testing equipment

About Hardness testing

DELVE DEEPER INTO HARDNESS TESTING

If you would like to know more about the hardness testing methods for metallic and other materials, including a full definition of hardness testing, the different applications of hardness tests and how to prepare for hardness tests, download our resources.

See our Hardness Testing Application Note

See our Hardness Testing Conversion Poster

Contact us!

icon-arrow